FAQ & How To
How tech-savvy do I need to be to use a Sabai VPN Router?
Regular router vs. VPN router, what is the difference?
What is the difference between a Sabai OS Router and routers flashed with DD-WRT or Tomato?
Do I need to purchase one router for VPN and one for my local internet?
Will Sabai VPN Routers work in my location/country/area/situation?
What is the difference between 2.4 GHz and 5.8 GHz WiFi connection?
How To
Set up OpenVPN and PPTP on your Sabai VPN Router
Static IP assignment and changing the Host Name of a device
How to find the version of SabaiOS that is currently running on your Sabai VPN Router
How to connect external devices
How to wirelessly connect a PS4
How to change NAT type for PS4 or Xbox
How to Port Forward a Foscam Wireless IP Camera
How to optimize your WiFi Connection
How to reboot your VPN Accelerator
How to Set Up a Mesh Network with a Stand-Alone Sabai VPN Accelerator Model Z or Model A
Troubleshooting
Advanced speed troubleshooting
Changing MTU on your Sabai Router
Changing MSS on your OpenVPN Script
Other Resources
How tech-savvy do I need to be to use a Sabai VPN Router?
Not at all! Sabai Technology has customers from all walks of life, all over the world, and at a huge range of ages, backgrounds, and skill levels. Unlike routers flashed with dd-wrt or Tomato, there is no programming knowledge necessary to use a Sabai Router. If you have ever set up a router on your home network before, the process is very similar. Most customers can set up a Sabai VPN Router in about 5 minutes and very thorough instructions are included with every order. If you do get stuck, you can always connect to our Technical Support Staff and we will walk you through the process!
Regular router vs. VPN router, what is the difference?
Regular routers are very good at wirelessly connecting all of your network devices. If you have a VPN account, you can run it on your computer that is on this network, but you can not share that account connection with other devices on that network.
VPN Routers by Sabai, such as the Sabai Powered Netgear Nighthawk R7000, allow your VPN account to be run on the router itself, meaning you can run multiple network devices on the VPN simultaneously. For example, you can have a laptop in the kitchen streaming Pandora over VPN while your child is playing Xbox Live over VPN in the living room - all on a single VPN account. In many ways, it functions the same way a regular router does except with added functionality that Sabai optimizes for the best VPN experience possible.
What is the difference between a Sabai OS Router and routers flashed with DD-WRT or Tomato?
Sabai OS, which comes pre-installed on all of our routers, has features not available on any other VPN client router operating system. Dual gateway, port forwarding, and easy OpenVPN setup are specific to the Sabai operating system. The Sabai OS also has many settings already configured for VPN clients. A customer using dd-wrt or Tomato would have to figure that out for themselves.
Another huge difference between Sabai Technology and our competitors is the technical and customer support peace of mind that comes with a Sabai purchase. A 90-day satisfaction guarantee and 1 YEAR of Sabai Freedom, our one-on-one technical support, come standard with every purchase. If you still need support after that time, you can always email or chat with us, or purchase Sabai Freedom for another year of the same phone and remote-in service that comes with your initial purchase. If you have any further questions, try watching one of our videos, reading our blog, or contacting us at support@sabaitechnology.com.
Do I need to purchase one router for VPN and one for my local internet?
Not with Sabai Technology's custom operating system featuring Gateways! This unique feature lets you have complete control over which devices are on VPN and which are on local internet - all within a single router. Changing a device from local to VPN is easy with our easy to use interface, a change you can make as often as you like!
Will Sabai VPN Routers work in my location/country/area/situation?
Simply put, Sabai VPN Routers will work anywhere in the world. Sabai VPN Routers come with a standard American style plug and most models are dual voltage. We also sell a simple power plug adapter and a Universal Step Up / Step Down Power Converter on the website. Refer to each model's product description for more details.
VPN Routers by Sabai support wireless B, G, B/G Mixed, N, and AC devices and are available in 2.4 GHz, 5 GHz, and dual-band, effectively guaranteeing that they will work with any network device. You can read our Ultimate Router Comparison Guide HERE.
How to find the version of Sabai OS that is currently running on your Sabai VPN Router
1.Connect a computer or tablet to your Sabai router via ethernet or by wireless. By default the wireless password for Sabai24 and Sabai58 is sabaipass123.

2. Open a web browser and in the address bar type 192.168.199.1. If prompted, use admin/sabaipass123 to login.

3. Navigate to the upgrade section of the router. The Current version section will tell you the version of Sabai OS that is on the router.

You can find the latest version of Sabai OS for each router here.
Gateways Setup
Log into your Sabai Router, click Network, then Gateways.
Each device connected to your network will appear in the Gateway Setup list.
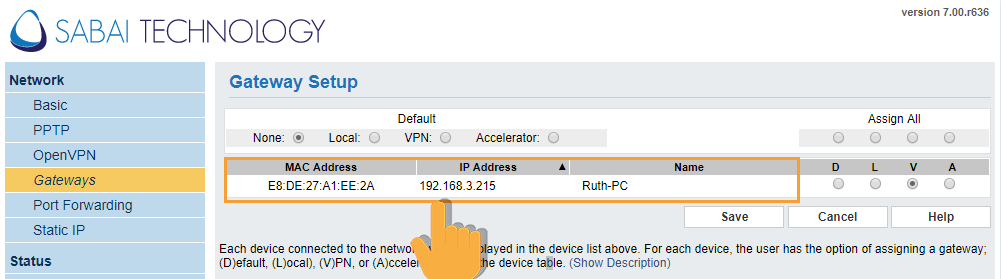
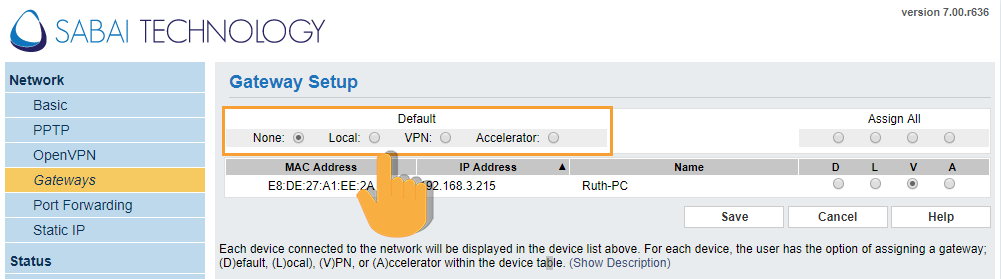
Start by assigning your default setting. The Default setting indicates how any device added to your network will automatically connect.
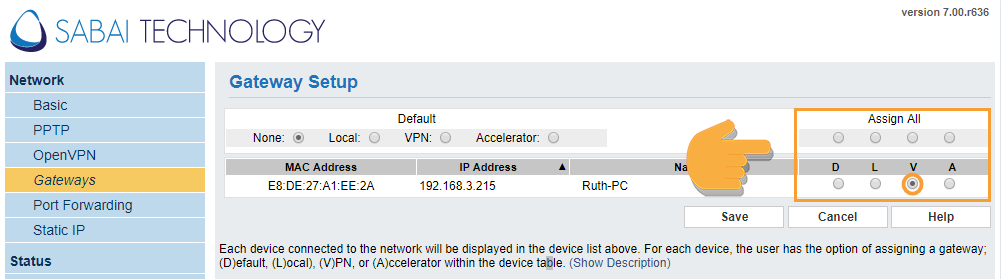
Or you can manage each device manually with the radio buttons to the right of each device.
Click Save.
Static IP assignment and changing the Host Name of a device
Log into your Sabai Router
Click Status/Device List and find the IP address of the device that needs to be assigned a static IP. Note the IP address of the device. Click [static] below the MAC address.

Set the name of the device and click Add and then Save.

If you get a "Duplicate MAC address" error message then your device is already assigned a static IP address.

Find the entry in the list and change the Hostname of the device. Click OK.

Click Save at the bottom of the page.
![]()
Port Forwarding
Log into your Sabai Router
Click Status/Device List and find the IP address of the device that needs port forwarding setup. Note the IP address of the device. Click [static] below the MAC address.
Set the name of the device and click Add and then Save.
Click on Network/Port Forwarding.
-
For this example, we will be setting up port 32400 to be forwarded to 192.168.199.138.
-
Select the protocol; TCP, UDP, or both (you can select both if you are not sure)
-
Select the network type your device is using; local network (WAN), VPN network (VPN).
-
*port forwarding does not yet function through the VPN Accelerator
-
Type in the external port that you wish to forward.
-
Give your port forward a description so you know what it is.

Once you are done, click Add then Save
Connecting external devices
If you are connecting an iPad, Apple TV, gaming console* or any other external devices, when setting up your router you will want to enable the UPnP on your router. It is very simple! Navigate to the Menu Bar on the left side of the page. You want to expand the Advanced Option. Click on Firewall, then UPnP & NAT-PMP. Check the First two boxes and Save the settings. Devices should now be able to connect.
How to wirelessly connect a PS4
-
Power-cycle ALL network equipment. Turn off (unplug) all of your network equipment, including any wireless access points, routers, Voice Over IP (VOIP) modems, and broadband modems for two (2) full minutes.
-
Make sure that all settings for the access point have been completed.
-
Check that there is an access point connected to a network with Internet service near the PS4. Settings for the access point are typically set using a PC. For details, contact the person who set up or maintains the access point.
-
Confirm that an Ethernet cable is not connected to the PS4. If the Ethernet cable is plugged in, the PS4 will automatically attempt to connect via the wired connection.
-
On the XMB™ home menu, go to (Settings) > (Network Settings) and press the button.
-
Then go to (Internet Connection) and select [Enabled].
-
Then scroll down to (Internet Connection Settings) and press the button.
-
Select [Yes] when a confirmation screen is displayed stating that you will be disconnected from the Internet.
-
Select [Easy] and press the button.
-
When prompted for which type of connection method, select [Wireless] and press the button.
-
Under WLAN Settings, select [Scan] and press the button.
-
If you own a wireless access point that supports AOSS (AirStation One-Touch Secure System), then you must select [Automatic]. These wireless access points are commonly made by Buffalo, Inc. AOSS will automatically configure the necessary settings. Follow the on-screen prompts to complete the setup.
-
You will see a list of access points within range of the PlayStation 3. From the list, pick your SSID and press the button.
-
If you do not know which SSID you should use or if an SSID is not displayed, contact the person who set up or maintains the access point for assistance.
-
On the next screen, confirm the SSID then press the right direction button to continue. If you press the button, you will edit the SSID.
-
Select the security setting that you want to use and press the button.
-
The types of security settings vary depending on the access point. Contact the person who set up or maintains the access point for information on which setting to select. NOTE: Unless changed: Sabai Routers will default to WPA2 Personal (PSK) + AES
-
If you selected a Security Setting, enter your security key.
-
Press the [Start] button to exit the on-screen keyboard.
-
Press right on the directional pad to proceed to the next screen.
-
The encryption key is displayed as a series of eight [*] no matter how long the key may be. If you do not know the encryption key, contact the person who set up or maintains the access point for assistance. NOTE: This would be your WiFI password - sabaipass123 by default.
-
Once you have entered all the information, a list of settings will be displayed.
-
Press the button to save these settings.
-
Depending on the network environment, additional settings for PPPoE, proxy server, or IP address may be required. For details on these settings, refer to the information from your Internet service provider or the instructions supplied with the network device
-
Press the button to test the connection.
-
When the test is complete (usually less than a minute), it will display the results ("Succeeded" or "Failed").
-
If you have successfully connected to your network, congratulations, you have completed the network setup process.
If you need additional help, feel free to email us at support@sabaitechnology.com. We're happy to help get your PlayStation set up.
How to change NAT type for PS4 or Xbox
Log into the router control panel by entering 192.168.199.1 in the address bar of your web browser.
Click on Advanced > Firewall > UPnP & NAT-PMP and enable UPnP & NAT-PMP. Click Save.
If this does not resolve the issue you will need to use port forwarding. 
How to Connect a MacBook Air
Apple’s innovative MacBook Air is known as the thinnest and lightest laptop of them all. If the MacBook Air acts as a primary computer in your home, step one presents a challenge. No Ethernet port!
Luckily, with the Sabai VPN Router, the solution is incredibly simple. Because each Sabai VPN Router is shipped out pre-configured with Sabai OS and ready to “plug and play,” there is already a wireless network built in for your MacBook to connect with.
-
With your Sabai VPN Router plugged in, look for the sabai24 wireless network in your Wi-Fi menu.
-
Enter the default password, sabaipass123 to connect to the network.
-
Continue with the Sabai Router setup as normal.
How to connect a Roku to WiFi
1.Turn on your TV. If your using a Roku TV, skip to Step 6.
2. Connect your Roku Player to your TV using an HDMI cable and turn it on. If you have a Roku Streaming Stick, plug it into an HDMI port on your TV.
3. On your TV, select the input that matches your Roku HDMI connection.
4. Exit your TV settings. The Roku Home screen will display.
5. Using your Roku remote, select Settings > Network > Wireless (Wi-Fi) > Set up new Wi-Fi connection. A list of available WiFi networks is displayed. Select your WiFi network from the list.
6. Use the on-screen keyboard to enter your WiFi network password. Your Roku device is now connected.
Port Forwarding for Foscam Wireless IP Camera
Setup port forwarding for VPN on the port that the camera is using. The Port forwarding is fairly straight forward, for example, when you access the port forwarding page it asks you for several pieces of information.
If you are using the VPN as Gateway then you will use the VPN public IP address followed by a colon and the external port you have used. If you are using the Local Gateway and have setup the camera on VPN then again use the VPN public IP address. However, if you have it set to local then use the Local IP address to access it. This of course is all from outside your network.
WiFi connection Optimization
Troubleshooting
Speed Issues
Having issues with speed? There are a few things you can try to resolve the problem on your own.
When you are experiencing a slow-down in your VPN speed, a number of things could be contributing factors. We have noticed that older versions of certain web browsers can disrupt speed tests, so make sure that your internet browser is updated to the latest version. Check your Java to make sure it is also updated. Similar to the outdated web browser, if the updates on Java are not completed, speed tests can be affected. Once you have verified that your programs are up-to-date, you can begin the speed tests.
Performing a few speed tests can help you find the fastest server for your location and help you understand what you can expect from your VPN.
Follow these simple steps:
-
Disconnect from your VPN tunnel so you are on your local internet connection. Once on your local connection, perform a Speed test on speedtest.net.
-
Next, click on the New Server button and drag the green square on the world map over to the location of the VPN server you are using (NY, San Francisco, London, etc.). Mouse over each dot until you find the correct city and click it to perform a speed test. This will give you the best example of uninhibited internet access to that location. Your VPN will be slower than this speed because of encryption.
-
You can repeat the test to different server locations that are included in your VPN plan and use the one that gives you the best speed. Once you have determined which is best, log onto your VPN account and switch to a server in that area.
-
Enter the new server information into your Sabai Router by following the instructions included with your shipment.
If you are unable to resolve you speed issues with these tests, contact us at support@sabaitechnology.com.
Advanced speed troubleshooting
For optimal VPN speeds, one common adjustment is MTU or Maximum Transmission Unit. Adjusting this setting on your computer, VPN Router, or OpenVPN script, allows more bytes of data through that protocol layer. While this may seem intimidating, the basic troubleshooting for MTU is relatively simple.
Finding your MTU Settings
Visit speedguide.net:8080 to determine what defaults your MTU and MSS are set at. If your MTU is less than 1500 see below, Changing MTU on your Sabai Router. If your MSS is less than 1400, and you are on OpenVPN, try Changing MSS on your OpenVPN script as well.
Note: If you are on DSL with PPPoE, your maximum MTU is 1492. If you use PPTP, you can not change your MSS.
Changing MTU on your Sabai Router
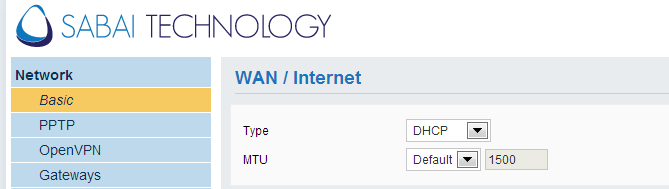
On your Sabai VPN Router, visit the network page.
In the first drop down next to MTU, change from default to manual. This will allow you to manually change the second field to 1500, the largest allowed by Ethernet. Click Save.
Changing MSS on your OpenVPN Script
If you use StrongVPN as your VPN provider, changing your MSS on your OpenVPN script is simple. If you use another VPN service, please check with that provider’s technical support to ask how to make this change or look for it under advanced options. Not all providers allow MSS changes.
While logged into your account, look for the MSS & Fragment link under Special Actions. Change the MSS setting to 1300, save and export a new script for your VPN Router.
These setting changes will solve most, but not all, MTU lag issues. However, there are many articles available that include more advanced troubleshooting. If you still aren’t happy with your speed, get in touch with our technical support.
Wireless connection for Mac
If your Mac frequently disconnects from your wireless network, follow these steps:
-
Go to Apple Menu on the upper left-hand corner of the screen. Select System Preferences>Network Icon.
-
In the dialog box, Click on the Advanced tab in the lower right-hand corner. Drag your network entry to the top of the list (It may take a few tries to grab and move to the top of the list.)
-
Click Apply Now and shut down the computer.
-
Next, restart the computer and zap the PRAM (Clearing the PRAM helps with any corruption that may have occurred).
-
To zap the PRAM, hold down the Command (?), Option, P, and R keys simultaneously immediately after re-starting the system. You must do this before the gray screen appears. Don’t let go of the keys until you hear the startup sound for the second time.
If this does not solve the problem, please contact us at support@sabaitechnology.com.
How to reboot the VPN Accelerator
If you experience issues with your VPN Accelerator, the first thing to do is reboot. If you need to do so, follow these instructions:
- Turn off the VPN Accelerator (press the power button, do not unplug)
- Set the Sabai router Gateways default to None
- Reboot the router
- Restart the VPN Accelerator, check that the VPN has connected
- Set the Sabai router Gateways default back to your choice
If you’re still having issues, Feel free to talk with one of our Technical Support Technicians.
How to Set Up a Mesh Network with a Sabai VPN Router - including a Sabai VPN Router with a VPN Accelerator
Using a VPN Accelerator as a stand alone use How to Setup a Mesh Network with a stand-alone Sabai VPN Accelerator Model Z or Model A
-
Connect the MESH router to the Sabai VPN Router with an Ethernet cable and power it on.
-
Follow the instructions that came with the MESH router to set up the device as an Access Point. (Do not set up in router mode and do NOT use the WPS instructions)
-
Set the WiFi SSID's to something different from the Sabai VPN Router WiFi SSID's (typically Sabai24 and Sabai58)
- Set the Channels to ones that are different from the ones used by the Sabai VPN router. To find this information, log into your Sabai VPN router and click on Network/Basic. Scroll down to the WiFi sections to find the Channel entry.
-
Place your Mesh network where you need it and enjoy!
How to Set Up a Mesh Network with a Stand Alone Sabai VPN Accelerator Model Z or Model A
Other VPN Accelerator models use How to Setup a Mesh Network with a Sabai VPN Router
Connect the MESH router to the Sabai VPN Accelerator with an Ethernet cable.
Model Z must use right hand Ethernet port closest to the power cable.

Model A must use the second port to the right of the power button. Usually labeled LAN1.

-
Follow the instructions that came with the MESH router to set up the device as a router if you are using only the MESH network to make the connection to your VPN Accelerator.
-
For more complex situations please email support@sabaitechnology.com and our friendly staff will be glad to help you.
-
Place your Mesh network where you need it and enjoy!