
How to Flash DD-WRT Firmware on a Router
Don't want to fool with these instructions? Buy a pre-flashed DD-WRT router here. Satisfaction Guaranteed.
Routers run an operating system called “firmware”. The firmware controls the router’s security, routing protocols and other network services and features. While the manufacturer's firmware is usually sufficient for the average router-user, it usually lacks features that some users want or need. In order to circumvent these limitations, many chose to “flash” their router with a third-party firmware. To flash a router means to replace the operating system on the router’s flash memory.
Third-party firmware usually offers more functionality than the out-of-box firmware and it’s a great solution for a VPN Router. The most popular third-party firmware is an open-source firmware called DD-WRT. This custom firmware allows you to boost the WiFi signal in your wireless router, run an OpenVPN or PPTP client and remotely access your home network. The features are different for each third-party firmware but, those are just a few benefits of DD-WRT.
Keep in mind, while flashing a router with a custom firmware can offer great benefits, it also comes with its own risks. Failure to prepare or complete research on the correct build for your router can cause frustration, time loss, or you could even “brick” your router. The term “brick” is used when you unsuccessfully flash a router (or flash it with the incorrect firmware) and render it useless. When a router is bricked, you are unable to recover the firmware in order to utilize the hardware and it can then only be used as an expensive paperweight. This is why many users choose to purchase a professionally pre-flashed router with Sabai OS such as the Netgear R7000, or a preflashed DD-WRT router.
Today, I am going to show you how to flash a router with DD-WRT firmware. Before you get started, you will need to choose a router that is compatible with DD-WRT. DD-WRT does not support all router models so, be sure to choose a router that has a current build available. A build is a version of the firmware packaged for a specific router's hardware. You can find this by searching the DD-WRT Database. There are different maintainers of the DD-WRT project so you’ll need to do some research to find the best build to use with your specific router.
Once you have selected a compatible router and you’ve completed your research on the correct build, you can can follow the steps below to flash your router with DD-WRT. DO NOT, under any circumstances, attempt to flash a router over a wireless connection (Wifi). This will greatly increase your chances of corrupting the firmware update process. Always use a wired connection. As previously mentioned, this process can be very risky. Please proceed at your own risk.
Please note: I will be using a Netgear Nighthawk R7000 for these instructions. The images, screenshots, and instructions will vary for each router. Read these instructions in their entirety, at least once, BEFORE starting the flash process. This is crucial.
STEP ONE. Download the DD-WRT firmware for your specific router.
- DO YOUR RESEARCH. You will need to do your own research to find the correct DD-WRT version/build for your router. Download and save the correct DD-WRT firmware file to your computer.
Remember— using the wrong file during this process can brick your router.
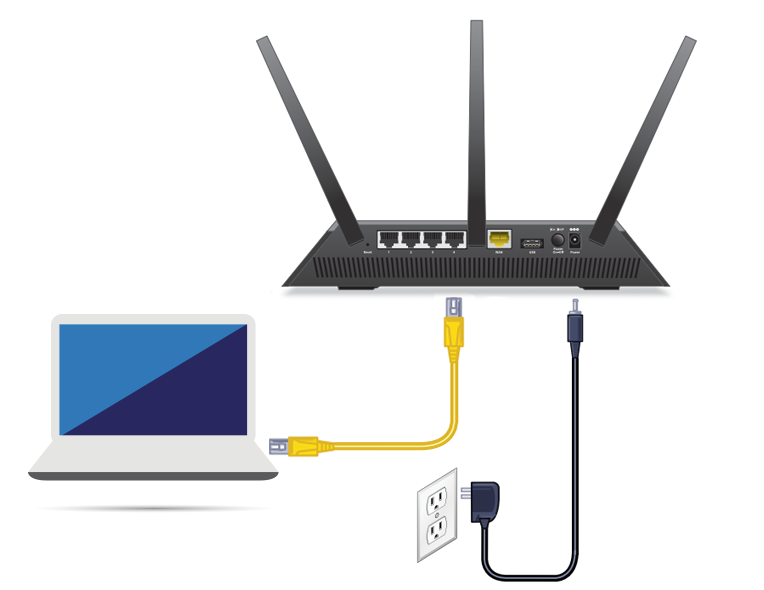
STEP TWO. Setup your hardware.
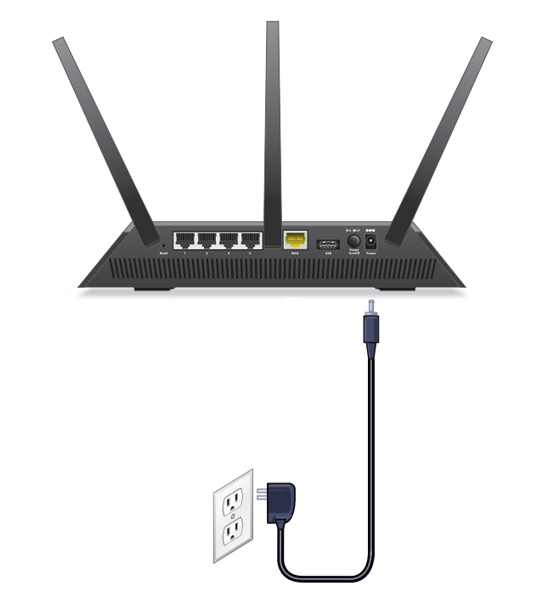
- Plug in and power on your router.
- Plug one end of an ethernet cable (also called a network cable or a patch cable) into one of the LAN ports on the back of your router. Most routers have 4 LAN ports.
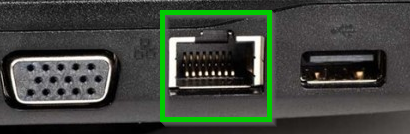
- Plug the other end of the ethernet cable into the LAN port of your computer. This may also be labeled “Ethernet”, it may have a network icon, or it may not be labeled at all.

Hardware Setup for Flashing a Router with DD-WRT
STEP THREE. Install DD-WRT on your router.
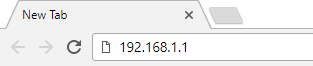
- Enter your router’s IP address into your web browser’s address bar and press enter. Most routers are set to 192.168.1.1 or 192.168.0.1
I recommend using Google Chrome.
- The admin page will probably require you to log in. The default credentials for most routers are admin/password or admin/admin. If you do not know the login information for your router, visit your router manufacturer’s website.

- Once you’ve successfully logged into your router, navigate to the Admin(istration) > Router Update/upgrade section of your router. This is usually in the Advanced Settings section of your router. This is where you will load the specific build file for DD-WRT that you previously downloaded. Click “Browse”, select the DD-WRT file and then click upload.
Remember— every router is different. Some routers have a CFE bootloader menu that requires you to press certain buttons, in sequence, to bring you to this menu (instead of accessing it via the admin page as I just described.) So, I cannot stress enough - do your homework before jumping into this process!
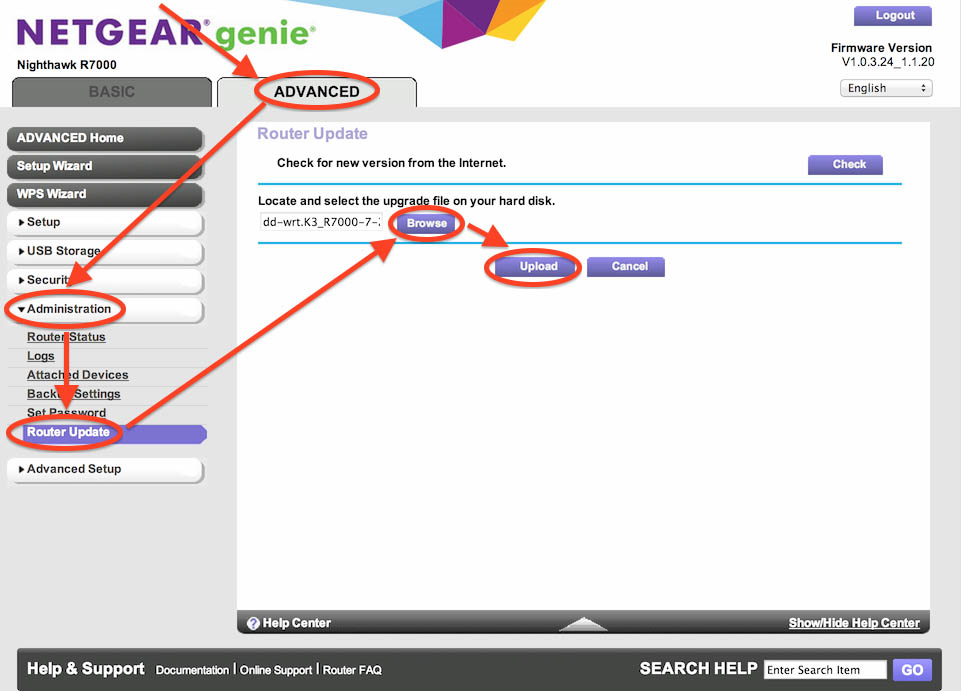
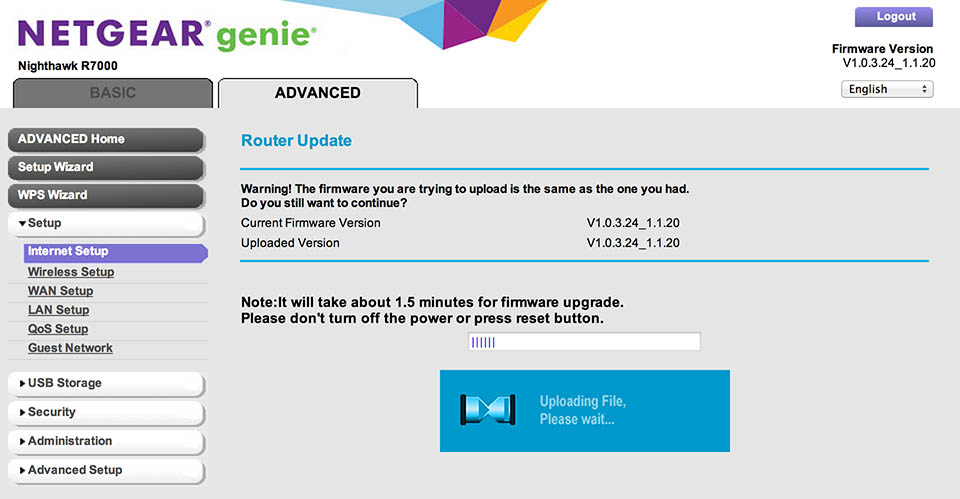
- After clicking upload, your router will normally provide a warning and ask a question like “Warning, the file you are loading is the same or older than the one you currently have, are you sure you want to continue?” Only proceed if you are confident you have the correct file for your router model. Click “continue” or “ok”. Your router will begin uploading the DD-WRT file. You should get a screen that looks similar to the one below.
DO NOT unplug the router's power cord or switch the power off during this process. If you do, there is a good chance you will brick the router.
- Once the upload/update has completed, the page should clear. I suggest power cycling your router. This should give your computer the router's new IP address and settings (if applicable).
- After restarting the router, log in to your newly flashed DD-WRT router. Open a web browser and enter the IP address 192.168.1.1 into the address bar.

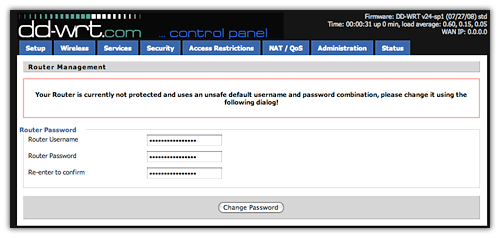
- This will bring you to the DD-WRT Router Management page where you will set your new router login credentials. Make sure to remember/save your new username and password to access the router’s control panel in the future. Once you have set the username and password, click “Change Password.”
This is NOT your WiFi username and password. This is the username and password to access the router’s control panel via it's IP address.
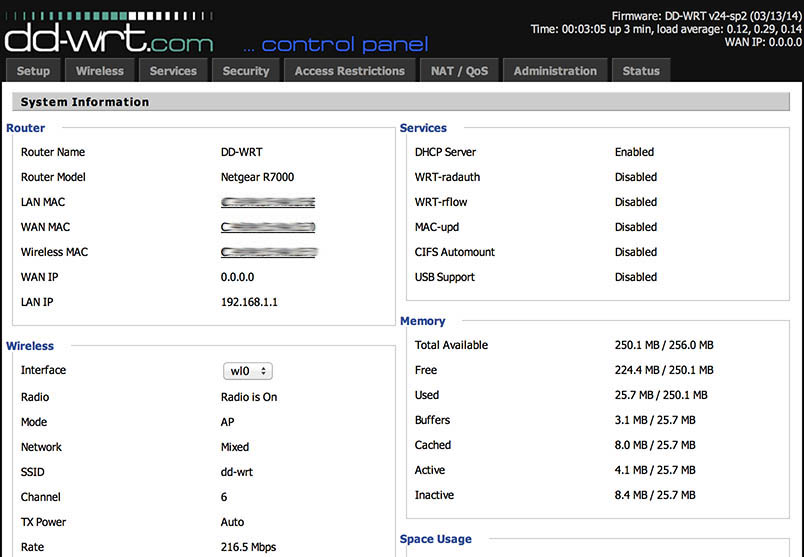
- After changing your router's credentials, you can navigate the entire control panel. If you get to this screen—Congratulations! You have successfully flashed your stock router with DD-WRT firmware. You now have access to all the benefits this custom firmware solution offers.
If you plan to use it as a VPN Router, you'll need to sign up with VPN service provider and configure the VPN client on your DD-WRT router. After that, you're good to go!
Want to contribute or make a donation to the DD-WRT project? Read more here.
If you would like assistance flashing your router with DD-WRT or Sabai OS, you can email our help desk at support@sabaitechnology.com for more information.
Recent Posts
-
VPN Router Stuck on “Retrieving Internet IP”? Here Is the 2-Minute Fix (2026 Guide)
If your VPN router is stuck on “retrieving internet IP,” it is usually caused by missing VPN server …May 5th 2026 -

What You Need to Know to Donate Safely Online
Cybersecurity has become an increasingly critical issue in the digital age. For instance, in 2016, m …Mar 10th 2022 -

What is a Default Gateway?
A default gateway is where all your internet traffic goes first before leaving your network. That’s …Jan 4th 2022